Showing posts with label Cheddar. Show all posts

Sunday, December 1, 2013

All-American Starters - Southern Cheese Board: Pimiento Cheese, Candied Bourbon Pecans & Bacon Cheese Truffles

Hope y'all had a great Thanksgiving! Could you hear this Yankee saying that in my best Southern accent? We sure did, and as usual, we were treated to a great meal from start to finish. It's become custom for me to be in charge of holiday hors d'oeuvres, and this year was no different. It will also surprise nobody that I chose to present a cheese plate (I just love cheese), or that said cheese plate would be themed. What can I say, I like continuity. It's kind of how I roll

I'm still feeling inspired by our family's recent South Carolina culinary adventure, so the foods of the South have been on my mind. With Thanksgiving being the quintessential American holiday, it just made sense to showcase some treats inspired by the American South.   

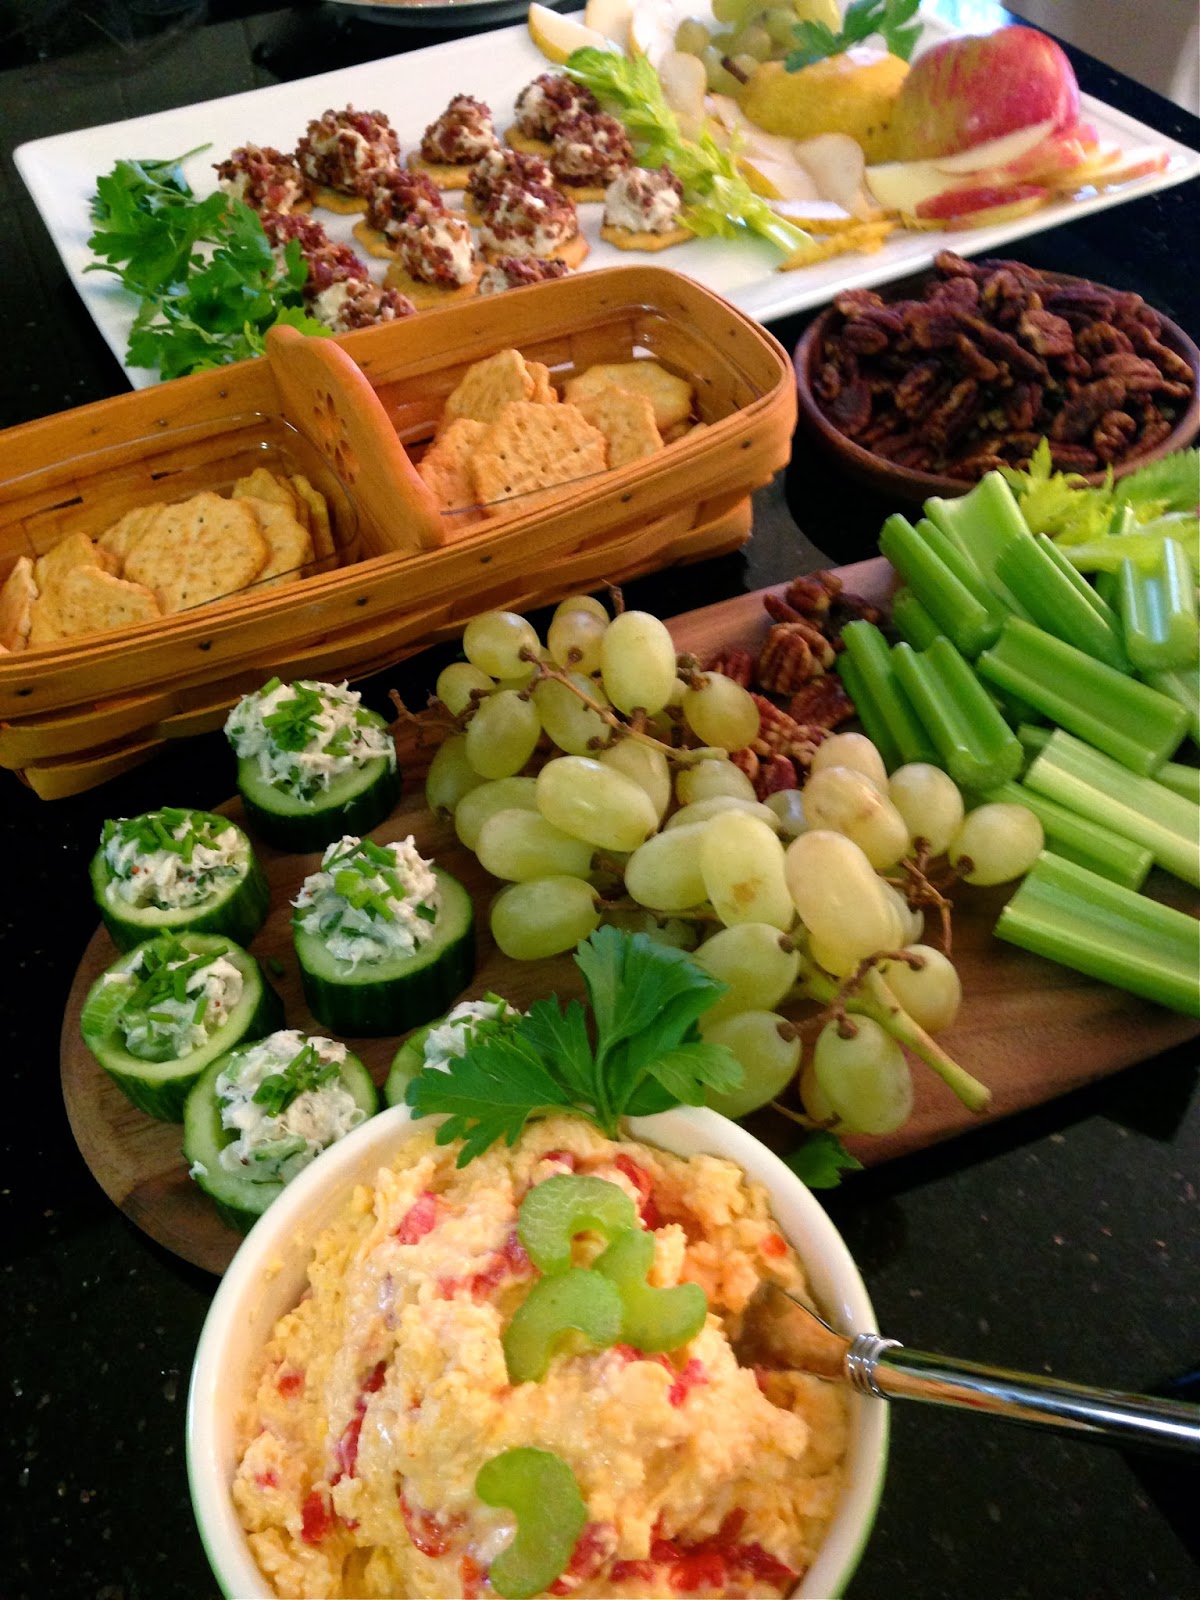
Southern Cheese Board with Pimiento Cheese, Bacon Cheese Truffles, and Candied Bourbon Pecans,
+ Crab Salad on Cucumber Chips, Photo: NK

From classic Pimiento Cheese, to Candied Bourbon Pecans, to Bacon Covered Gorgonzola Truffles, I think I succeeded in hitting each sweet, savory and salty note that I'd aimed for. Was it a little rich? Oh yes, but each component to this year's Southern Cheese Selection can stand nicely on its own if you prefer. Feel free to pick and choose whether to make all the elements or just one or two. Side Note: sinfully delicious sweet and salty bourbon pecans make a great homemade holiday gift!

Elements For The Perfect Southern Cheese Plate:
Pimiento Cheese (Recipe Below) - served with celery and Ritz Crackers for dipping.
Sweet and Salty Candied Bourbon Pecans (Recipe Below) - scattered about for a sweet, crunchy counterpoint.
Gorgonzola Bacon Truffles* (Click HERE for Recipe) Gorgonzola isn't really southern but bacon sure is.
Assorted Fruits and Garnishes -Tart green grapes, super ripe Pears (which go wonderfully with the bacon truffles), apples and apple slices, celery tops (for decoration), and flat-leaf parsley for color.

Need an extra hors d'oeuvre? Try our perennial favorite, Crab Salad with Cucumber Cups (pictured above, recipe HERE).  


Gorgonzola Bacon Truffles, Photo: NK

Note* I attempted to adapt the Gorgonzola Bacon Truffle recipe using low-fat cream cheese and gorgonzola dolce which was not pre-packed/crumbled. It didn't work too well! My truffles weren't firm, even after chilling. The result was still delicious, so I decided to serve them on a cracker so that guests wouldn't have to attempt scrape them off the plate. Part of cooking is thinking on your feet!      

In short, I'd recommend following Southern Living's recipe to the letter, as I suspect my ingredient choices did not offer a dense enough in consistency to begin with. I also recommend chilling the mixture in the freezer before rolling out the truffle balls. 


Sweet and Salty Candied Bourbon Pecans
Lightly Adapted from Justapinch.com/Recipe by Pat Duran
Candied Bourbon Pecans, Photo: NK
Yield: 4 Cups

Ingredients:
4 Cups Pecan Halves (we used Diamond brand)
1 stick Salted Butter (not margarine)
1 1/4 Cup Dark Brown Sugar
1 teaspoon high quality Cinnamon
1 teaspoon Salt
1/4 Cup Bourbon
1/4 - 1/2 teaspoon Cayenne Pepper (depending on how spicy you prefer)

Method:

1. Preheat the oven to 350. Lay pecans on a rimmed baking sheet and bake for 10 minutes  until fragrant. Move toasted pecans to a bowl and set aside.

2. In a large, heavy skillet (cast iron if possible), melt the butter over medium heat, stirring it as it melts or else it will brown. Add toasted pecans and stir to coat well. Next, add the brown sugar, salt and cinnamon. Turn down the flame just a touch and continue to stir constantly for a full 10 minutes. Do not leave the nuts unattended. The sugar will gradually liquify and candy the nuts.

3. Now, add the bourbon slowly and carefully as it could flame, then stir to combine for about 2 minutes. Sprinkle nuts with optional Cayenne if you choose. Remove skillet from the heat and pour pecans onto a baking sheet that has been lined with parchment paper. Spread them into a single layer as best you can. Allow to cool for 20 minutes and break up any clumps. Cool completely before serving or packaging.

NOTE: Pecans can be stored in an airtight container at room temperature for up to 1 week. 

Next up, the star of the show, everyone's favorite - Pimiento Cheese. For the uninitiated, pimiento cheese is a delightful blend of cheddar cheese, mayonnaise, and diced pimiento peppers. There are many variations from here, but I chose to adapt Andrew Knowlton's grandma's very straightforward recipe. A dash of worcestershire and some Tabasco made it my own. The result was a vaguely spicy but not overpowering and of course, it was gobbled up in no time flat. On the chance you have any leftover, toss it into macaroni for a quick mac 'n cheese, or spread on some toast for an improvised grilled cheese. The possibilities are endless

Classic Pimiento Cheese
Something for everyone, Photo: NK
Lightly Adapted from Andrew Knowlton/Bon Appetit
Yield - 3 Cups (enough for about 10 people) 

Ingredients: 
1 1/2 Cups (packed) Sharp Yellow Cheddar, finely grated
1 1/2 Cups (packed) White Cheddar, finely grated
1 Cup Low Fat Mayonnaise
1/3 Cup jarred Pimiento, drained and chopped
1/4 teaspoon Cayenne Pepper
1/2 teaspoon Worcestershire Sauce
2 dashes Tabasco Sauce (optional)
Salt and Pepper
Celery Sticks or Ritz Crackers to serve

Method: 
Mash all ingredients together and stir very well. Taste for seasonings. Add a few dashes of pepper and add  salt only if needed - the worcestershire should provide enough salinity. Chill until cold for at least 2 hours or up to 3 days. Serve with celery sticks and/or Ritz crackers. 

Bonus - check out my mom's beautifully presented spinach dip served in a cabbage! She uses the classic Knorr Recipe (don't skip the water chestnuts!). It's one of my favorites! 
Enjoy, and i hope everyone had a great holiday!


Knorr Classic Spinach Dip, Photo: NK

Monday, October 7, 2013

Perfect Poached & Roasted Chicken + Apple Cheddar Hand Pies - Fall Comfort Food In Less Than 5 Ingredients

Apple & Cheddar Hand Pies. Photo: NK
There's something kind of perfect about a rainy Sunday.  A license to cancel all your chores and plans, this is the kind of day that practically invites you to relax on the couch, savor your cup of coffee that much longer, and read the paper at a snail's pace. If all that sounds too taxing, you are more than welcome to have a little nap. As I always say, don't mind if I do.

On a days like this, a slow cooking, comfy and easy meal always seems to me to be in order - so that's just what I set out to do yesterday evening. The only question was - what to make? When I am in relaxation mode, I like to ensure that my cooking is even simpler than usual. Since I had resolved to brave the elements and go to the store in the rain, my goal was to make my grocery errand extra quick by planning a meal with just a few ingredients, many of which I already had on hand in the fridge and pantry. 

In just an hour and a half, you too can make this beautiful entree and comforting dessert of Milk-Poached and Roasted Chicken and warm Apple and Cheddar Hand Pies. As the aromas of fall cooking fill your house, pour yourself a crisp glass of white wine and kick back for a bit. It's Sunday. And I'll bet that a slow grin may just creep across your face because you know that you're about to be everyone's dinner hero.

Now for the inspiration: 

Entree
Last Sunday's entree idea came to me while paging through a recent issue of Bon Appetit when an article with breathtaking photos caught my eye. It began: 

"A beautiful woman cooking mouthwatering food in a gorgeous French farmhouse? Don't hate Mimi Thorisson: just follow her tips on how to throw a picture-perfect dinner party sans stress." 

Intrigued, I knew I needed to learn more about this mysterious Mimi. Turns out, her hosting and cooking philosophy really resonated with my own in that she focuses on simple preparations and quality, seasonal ingredients that are exceptional in themselves. She achieves what looks to be effortless elegance. This may be where our similarities end. As the creator of the most gorgeous site, Manger, the only thing more beautiful than Mimi's food itself is her real life in Médoc,France where she writes vividly about combing the local markets and foraging the land for the inspiration for lovely French-centric recipes. 

A further look at this blog is peppered with stories like Mimi biking home from the market and through the forest where she comes upon the first-of-the-season cepe mushrooms. You'll also enjoy her colorful recollections of sumptuous outdoor fêtes showcasing the finest in local ingredients through her elegant dishes. Mind you, despite her busy life with multiple children and dogs (something like 14!), Mimi remains positively beautiful thanks to an enviable figure and fashion sense beyond words. Do I envy her? As a lifelong Francophile myself, I must admit, I do! After all, this woman is living my dream life. Would I also like to "borrow" her wardrobe and also be blessed with her seemingly effortless, patrician elegance? But of course! 
Milk-Poached and Roasted Chicken, Photo: NK

Mimi's Milky Chicken seemed like the perfect dinner choice because it called for just a few ingredients. Poaching a whole chicken in milk and water before roasting it with some of the cooking liquid makes for an ingeniously easy yet extremely moist and tender bird. This recipe's delicate flavors do not compete with the meat itself, so buying a high-quality bird is important. Organic chicken is more expensive, but in this case, it is definitely worth it if you can splurge. If not, this will still be delicious. To enhance the original recipe, I added some optional fresh thyme to the braising liquid, and bathed the bird in quite a healthy sprinkling of paprika - easily one of my favorite spices - to add a little extra depth and interest. The resulting dish did not disappoint, and was positively delicious next to a simple salad of field greens and yellow cherry tomatoes. 

Dessert
While your chicken is cooking, you'll have plenty of time to prepare dessert. The idea for our incredibly easy Apple Cheddar Hand Pies comes from the classic combination of apple pie served alongside a piece of cheddar cheese. Just assemble the pies, remove your chicken from the oven and bump up the temperature to 375. When the oven's ready, pop these guys in for the next 23-25 minutes. 

By the time the pies cool a bit, you'll be ready for dessert. Why apple and cheddar? Well, for all you sweet and savory fans, this not-too-sweet yet still satisfying dessert is a great way to use peak season tart apples. Since I so rarely bake and am not naturally adept at it, you can be sure this recipe is foolproof. Just a bit of cheddar goes a long way, and while it nicely rounds out the sweetness of the apple, it is, in itself, not immediately detectable. You could play around with the cheddar to apple proportions to make this more savory. 

As usual, I will be using some baking shortcuts, which in this case take the form of Pillsbury roll-out refrigerated pie dough available where they sell slice-and-bake cookie dough. Special thanks to my Mom-in-Law for introducing me to this stuff. It is really good...the perfect Sunday (or any day) baker's helper. These little pies are also a fun idea for a cocktail party dessert, if I do say myself.  Bonus - they'll make your house smell like everything good about fall. 


Apple Cheddar Hand Pies, Photo: NK 
The Recipes

Milk-Poached and Roasted Chicken
Serves 2-3 
Lightly Adapted from Mimi Thorisson's Blog, Manger

Ingredients: 
1 good quality organic Whole Chicken (from 3 to 3.5 Lbs total weight)
4 Cups of Whole Milk
8 Cups of Water
Coarse Salt
Black Pepper
1/2 teaspoon of Paprika
5 sprigs of Thyme (optional) plus more for garnish

Method:
1. Preheat the oven to 300 degrees. 

2. In a large pot, bring the milk and water to a boil with several sprigs of thyme.
Place the chicken in the pot and poach for 15 minutes over a medium flame. 
Tender and delicious, Photo: NK

3. When chicken is finished poaching, carefully remove it to a roasting pan and pour about 2 ladles of poaching liquid over it. Sprinkle the bird very generously with salt and black pepper, inside and out. Pat the paprika onto the chicken as evenly as possible, covering as much of the bird's skin as you can. Add a bit more if you prefer. 

4. Now place chicken in the oven to cook for 45 minutes. Add about 3 more ladles of poaching liquid to the bottom of the roasting pan throughout the cooking process (I added 1 ladle every 15 minutes). 

5. Once you've hit the 45-minute mark, turn up the oven to 350 and cook another 15 minutes more until chicken is crispy and golden. The chicken should be finished but you can check it by piercing it to make sure the juices run clear. Allow it to rest for a few minutes before garnishing with thyme, carving and serving. Voila! 

Apple Cheddar Hand Pies
Apple Filling, Photo: NK
Serves 3 (6 pies in total, 2 per person) 
Recipe Adapted from Pillsbury

Ingredients:
2 sheet of Pillsbury Refrigerated Pie Crust thawed according to package instructions (you can freeze any leftover)
1 Cup finely chopped Gala or Rome Apple - approx 1 large apple
1 teaspoon Lemon Juice 
1 Tablespoon Sugar
1/4 teaspoon Cinnamon
1 egg, beaten
2-3 Ounces Sharp Vermont Cheddar, thickly grated
2 Tablespoons Butter, cut into 1/2 inch cubes + more for greasing baking sheet


Method: 
1. Preheat the oven to 375 with a rack in the middle. 

2. In a small bowl, combine chopped apple, sugar, cinnamon and lemon juice. Stir.
3. Grease a baking sheet with butter.

4. On a clean surface, carefully lay out two rounds of Pillsbury Refrigerated Pie Dough. 
Using a 3 inch cookie cutter (or mouth of a large juice glass) press out 12 circles of dough and remove the excess dough for another use. 

5. Paint 6 of the 12 dough rounds with beaten egg and sprinkle the middle of them with a few small pinches of cheddar. Top the cheddar base with one heaping Tablespoon of the apple mixture. Finish with another more generous pinch of cheddar on top of the apple mound and finish with one cube of butter per pie. 
Ready to Seal, Photo: NK

6. Now you are ready to finish assembling your pies. Use the remaining six rounds of dough to close each pie, one by one. To do this, stretch the rounds in your hand ever so slightly, and drape them on top of the apple and cheddar mound. Pinch them closed at the seams, pressing down with your fingers to seal. Do this step gently so you don't tear the dough. For any minor tears, just pinch dough back together with your fingers. Once finished you can work around the edges of each pie with a fork, carefully fluting the edges. 

7. Once all six pies have been assembled, paint the tops of them with more beaten egg. If you don't have a pastry brush, dipping a folded paper towel in the egg was works just fine. 


8. Ok - You are ready to bake!
Pop these babies in the oven for 23 - 25 minutes until golden brown and flaky.

Allow pies to cool a bit and serve warm. 
Now....

ENJOY!

I hope you enjoyed our easy and cozy fall dinner as much as we did. 
May your lazy Sundays be delicious too!